Creating a Signup

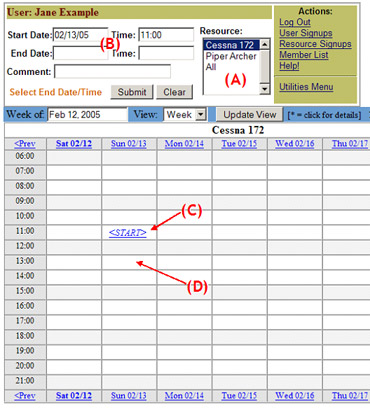
  1. Select the desired resource using the Resource menu (A)
  2. Enter the starting date and time (B) and click “Submit” OR click on the starting time block in the calendar (C)
  3. Enter the ending date and time at the top of the page OR click on the ending time-block in the calendar (D)

    (4-5 continued below...)

Hints:

  • To sign up for the shortest time period available, click on the <start> label.
  • After “submitting” the start-date, the calendar can be changed to view different days/weeks before entering the ending date and time.
  • Enter a comment for the signup into the signup form at any point during the sign-up process (may be required, depending on the scheduler rules)
  • When in Month view, signups can only be entered via the signup form.

  1. Note the available priority for requested time block and resource (A).
  2. To accept signup, click “Sign-up” (B). To cancel, click “Clear”.

Hints:

  • To move the signup to a different resource, simply click the new resource in the list. On some systems, a signup can be made on several resources at a time by using shift-click to select multiple resources from the list.
  • The list of available resources can be limited to only those resources which are available in the requested time block by clicking “List Available Only” (C)
  • On some systems or with certain privileges, you can sign up as another user by clicking the “As User” button (not shown – will appear next to “Sign-up”) and selecting a username from the supplied pull-down menu of users.

(Back to topics)